
Creating & organizing projects
Everything you do in Paddock lives inside a project. This guide is the practical, do-it-now companion to the Projects concept: that page explains what a project is; this one walks through how to create one, organize a growing collection, and tune it to your taste.
By the end you’ll know how to create a project of any shape, sort them into areas, set per-project metadata and agent behaviour, and rescue a root chat by promoting it into a project of its own.
Create a new project
Section titled “Create a new project”Click New Project — the button is in the left sidebar, and again on the projects home page (top-right, and in the empty state when you have none yet). That opens the New project dialog:
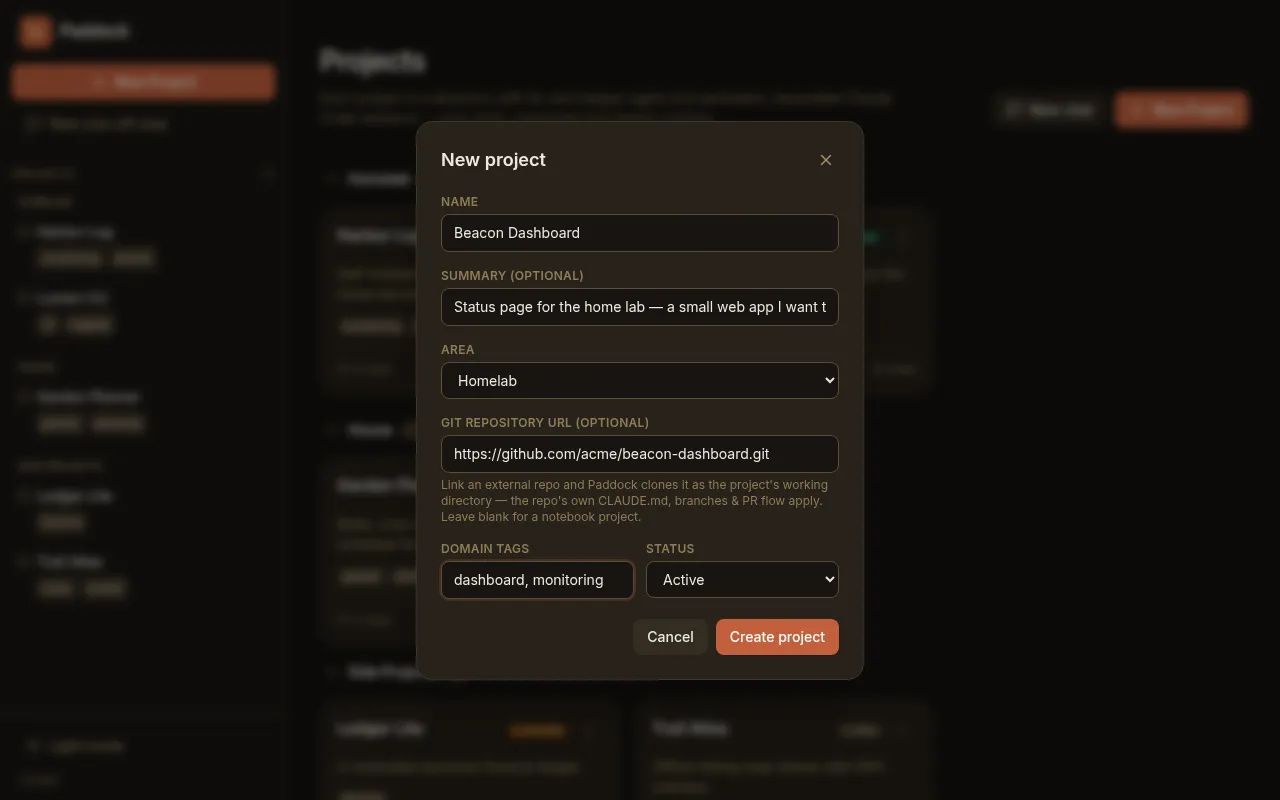
You only have to fill in one field — everything else has a sensible default:
- Name (required) — a human title, e.g.
Garden Planner. Paddock derives the on-disk slug from it automatically (Garden Planner→garden-planner), so you never type a slug. - Summary (optional) — one line on what the project is about.
- Area — the single group this project belongs to (see Organize projects into areas). Defaults to Unsorted; you can move it later.
- Directory on this machine (optional) — an absolute path where the project’s content lives, or should live (next section).
- Git repository URL (optional) — a repo for Paddock to clone, or to record as the remote behind a directory you named (next section).
- Domain tags — comma-separated, cross-cutting labels like
garden, planning. Unlike the area, a project can carry many tags. - Status — defaults to active. Pick
ideafor something you’re still mulling.
Click Create project and you’re dropped straight into the project’s first chat, ready to start working.
Choose the shape: two questions, not three types
Section titled “Choose the shape: two questions, not three types”There is no menu of project types to pick from. The dialog asks two independent questions, and everything else derives from your answers:
- Is this notes Paddock should curate, or a codebase it shouldn’t? That’s the managed axis.
- Where does the content live? That’s the Directory on this machine and Git repository URL fields.
The two are orthogonal — notes can live at a path you nominate, and a codebase can be one Paddock clones or one you already have.
Question 1 — notes, or a codebase?
Section titled “Question 1 — notes, or a codebase?”Managed means Paddock looks after the project’s own files: the
sweeper curates its CLAUDE.md, OVERVIEW.md, and
CHANGELOG.md. This is the classic notebook — research, planning, home-lab
runbooks, anything that isn’t itself a code repository. Claude works with Markdown
notes, docs, and the chat history, all curated inside Paddock.
Unmanaged means the content is code you or your agents source-control outside
Paddock. Paddock never writes project files into it, so the repo’s own
CLAUDE.md, branches, and PR workflow all apply — Claude can branch, commit, and
open pull requests against the upstream just like you would. OVERVIEW.md and
CHANGELOG.md are still curated, but they’re kept in the project’s own folder
inside Paddock’s data directory, safely outside your working tree. Its CLAUDE.md
is never touched.
You usually don’t answer this question directly. Leave both location fields blank and you get a managed notebook; fill either one in and you get an unmanaged project — which is almost always what you meant. There is exactly one genuinely ambiguous case, and that’s the only time the dialog asks:
One combination is refused outright: managed plus a git repository URL. Paddock curating files into a repo it also clones has no sensible meaning, so the create fails rather than quietly picking an interpretation.
Question 2 — where does the content live?
Section titled “Question 2 — where does the content live?”| You fill in | Where Claude works |
|---|---|
| Nothing | The project’s own directory inside Paddock’s data dir. |
| Git repository URL only | A checkout Paddock clones for you, nested inside the project directory. |
| Directory on this machine | That directory, used in place, with no copy — your real history, your branches, your remotes. |
| Both | The directory wins as the working directory; the URL is recorded as the remote behind it. |
HTTPS, SSH (git@host:owner/repo), git://, and local paths all work as repo
URLs. A directory path must be absolute, and must sit outside Paddock’s
own projects root and data directory, and outside every other project’s working
directory.
For a managed project a directory means something slightly different: it
nominates where your notes should live. OVERVIEW.md, CHANGELOG.md, and
CLAUDE.md then get written there rather than inside Paddock’s data dir — an
accepted consequence of asking for your notes to live somewhere specific. Only
project.yaml and the chat transcripts stay behind.
What Paddock does with the directory
Section titled “What Paddock does with the directory”The path doesn’t have to exist yet. What happens depends on what else you gave it:
| Directory | Repo URL | What happens |
|---|---|---|
| Exists | — | Used as-is. |
| Exists | Given | Used as-is, and Paddock checks its git remotes match. A mismatch is a warning, not a failure — a fork or an ssh-vs-https spelling is legitimate, but silently ignoring the URL isn’t. |
| Missing | Given | Paddock clones the repo to that path. |
| Missing | — (managed) | Paddock creates the directory. An empty folder is a fine place to start taking notes. |
| Missing | — (unmanaged) | Rejected. There’s nothing to clone from, and an empty directory isn’t a codebase. |
If a create fails partway through, Paddock removes only directories it made during that attempt — a directory that was already there is never deleted.
Why point at a directory you already have
Section titled “Why point at a directory you already have”This is the mode for running Paddock on your own machine over the clones you already work in — and two things follow from the working directory being one you also use by hand:
- Prior
claudesessions in that directory are offered for adoption. Transcripts are keyed by working directory, so the conversations you already had there show up in the project’s Adopt chats list. (This only ever surfaces sessions that really happened on this machine at that path.) - The
claude.transcriptsandclaude.mcpServerslevers finally mean something for a code project. Both key on the working directory. A project pointed at a clone Paddock made points at a directory you have never opened a terminal in, sotranscripts: hosthas nothing to share and your~/.claude.jsonhas no per-directory MCP servers registered for it. A directory you already use matches natively.
The Changes tab reports on the project’s working directory too, so it shows the state of your actual checkout.
path and the managed setting are both fixed at creation and immutable. The
working directory is baked into every transcript path, so re-pointing it would
strand the project’s history.
For the full mechanics of dir vs workingDir and where each file lands, see the
Projects concept page.
Promote a notebook to repo-backed
Section titled “Promote a notebook to repo-backed”A notes-only project that turns out to want a codebase doesn’t have to be torn
down and recreated. From its Settings tab, the Repository backing section
turns a managed notebook into a repo-backed project in place — keeping every
chat, OVERVIEW.md, CHANGELOG.md, and every bit of metadata it has accumulated.
This is the one transition across the managed axis, and it only offers itself for
a project that is managed and has no path of its own. An already-unmanaged
project has nothing to promote; a managed project with its own directory is a
notes folder you nominated, so Paddock refuses rather than turning it into a
checkout behind your back.
Paste the git URL, click Promote to repo-backed…, and confirm:
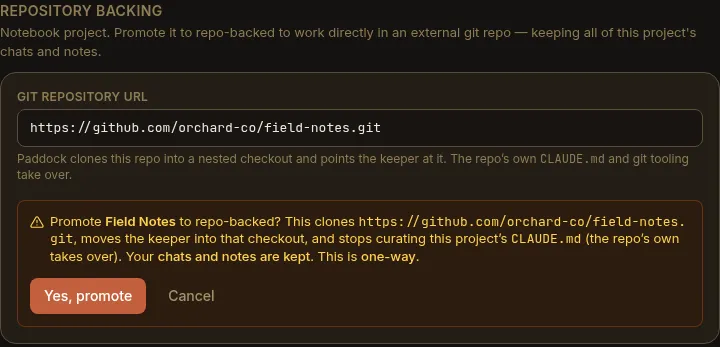
Paddock clones first, so a clone that fails leaves the notebook completely
untouched. Once the clone lands, repo: is written to project.yaml, the project
flips to managed: false, and the working directory flips to the checkout
— from then on the repo’s own CLAUDE.md, branches, and PR workflow apply,
exactly as for a project created that way.
Two consequences worth knowing before you click:
- The notebook’s
CLAUDE.mdis removed. It was Paddock’s to curate; the repo’s own now takes over. (The sweeper keeps curatingOVERVIEW.mdandCHANGELOG.md, which live outside the checkout — it just never writesCLAUDE.mdfor an unmanaged project.) - It’s one-way. There is no un-promote, and no way to point an existing repo-backed project at a different repo. Its Settings tab shows the repository and working directory read-only.
If a directory named after the repo already exists inside the project, Paddock refuses rather than overwriting it.
What a project.yaml holds
Section titled “What a project.yaml holds”A project is just a directory plus a project.yaml under your data root. You
rarely edit it by hand — the Settings tab
writes it for you — but knowing the shape helps. A fuller example:
# Paddock project metadata. Directory name MUST equal `slug`.# status: idea | active | paused | blocked | done | abandonedname: Garden Plannerslug: garden-plannerstatus: activedomain: - garden - planningvisibility: publicstarted: 2026-07-17updated: 2026-07-17summary: Beds, crop rotation, and a watering schedule for the back garden.group: houseThe fields:
| Field | What it is |
|---|---|
name, slug | Title and its derived directory name. slug is immutable. |
status | idea · active · paused · blocked · done · abandoned. |
visibility | public or private. |
summary | The one-liner shown on the card. |
domain | Cross-cutting tags (many per project). |
group | The project’s area — its single, exclusive home. |
started, updated | Creation date (immutable) and last-touched date (auto-bumped). |
links | Optional {label, url} bookmarks. |
managed | Whether Paddock curates this project’s CLAUDE.md/OVERVIEW.md/CHANGELOG.md. Optional; absent means !(repo || path), so an old file written before the key existed keeps the meaning it always had. managed: true alongside repo is rejected. Set once, at creation, and immutable — except that promoting flips it to false. |
repo | A git URL. Set once — at creation, or by promoting — and never changes. Alone it makes Paddock clone a nested checkout; alongside path it records which repo that directory is (a remote-match for adoption, and something to re-clone from), without moving the working directory. |
path | An absolute path to the directory the project’s content lives in. Set once, at creation, and immutable. Takes precedence over repo as the working directory. On an unmanaged project it’s a checkout used in place; on a managed one it’s where the curated notes should live. |
model, permissionMode, driveMode, maxTurns, docker | Per-project agent overrides — see below. Absent means inherit the box default. |
models | Optional allow-list narrowing which models this project offers — see Restrict the offered models. |
curation | Optional per-file sweeper token budgets — see Curation budgets. |
maxSpawnDepth | How deep this project may spawn tool-carrying children. |
pinned | The files pinned as tabs in the project header. Paddock maintains this for you. |
Paddock writes only the fields it needs: on a freshly created project, agent overrides you didn’t set are absent from the file and resolve to the box-wide defaults at run time. (Saving the Settings tab changes this for some of them — see the caveat there.)
Organize projects into areas
Section titled “Organize projects into areas”As your collection grows, the projects home page keeps it legible by clustering
cards under their area — the project’s group. An area is simply a
free-form label: the server stores whatever string you give it, so you can
have as many areas as you like and name them anything. The Area dropdown (in
the New Project dialog and in Settings) offers three ready-made ones —
Homelab, House, and Side Projects — plus Unsorted. Those four are
what the UI offers; to use an area of your own naming, set group: in
project.yaml (or via the API) and Settings will keep offering it thereafter.
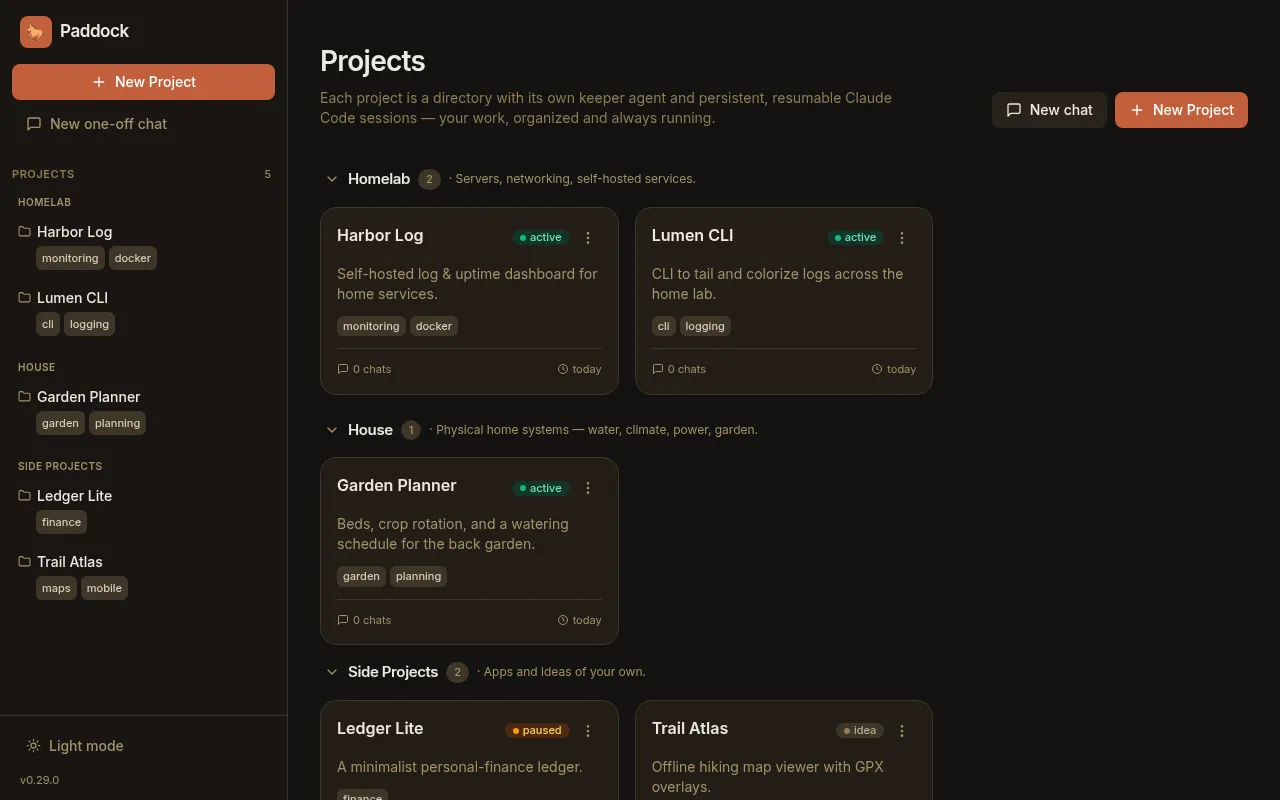
On the home page an area only becomes a section once at least one project uses it — a fresh Paddock with no projects shows no area sections at all. When sections do appear they’re ordered predictably: the three built-in areas first (in the order above), then any custom areas alphabetically, then Unsorted last. Each section is collapsible, with a heading and a project count. Set a project’s area at creation from the Area dropdown, or change it any time from Settings.
Tune the agent: the Settings tab
Section titled “Tune the agent: the Settings tab”Open any project and go to its Settings tab (/projects/<slug>/settings) to
edit everything the creation dialog left out, plus how Claude runs in that
project. Changes are staged and applied with Save changes.
Identity & metadata — Name, Summary, Status, Area, Visibility, Domain tags, and Links, all editable here. (Slug, Started, and Created are shown read-only.)
Claude — the knobs that shape how the agent runs:
- Model — which Claude model the project uses. Larger context windows (Opus/Fable/Sonnet: 1M; Haiku: 200K) fit longer chats.
- Permission mode — how much Claude asks before acting:
- Default (ask each time)
- Accept edits (the default) — applies file edits without asking
- Plan only
- Bypass all (use with care) — runs every tool unprompted; only for sandboxes you trust.
- Drive mode — Batch (one-shot per turn) is the classic path; Session
(cross-turn autonomy) keeps the agent alive across turns so features like
ScheduleWakeupand/loopwork. Leave it on Global default to inherit the box-widePADDOCK_DRIVE_MODE; a Reset to global default button clears an override. - Max turns — an upper bound (1–1000) on agent turns in a single run.
- Docker sandbox — run Claude inside a Docker container (needs a working Docker daemon on the box).
- Max spawn depth — how deep this project’s spawned children may themselves carry Paddock’s tools. Leave it on Instance default to inherit.
Below that block the tab carries three more sections:
Offered models,
Curation budgets, and — for a managed project with no
path — Repository backing. A final Derived
section shows read-only state the agent and sweeps maintain.
See Environment variables for the defaults a fresh project starts from.
Restrict the offered models
Section titled “Restrict the offered models”By default a project offers whatever models the instance offers. The Offered models field — a checkbox per instance model — narrows that for this project: the project’s own default model and the per-chat model picker are then constrained to the subset you tick.
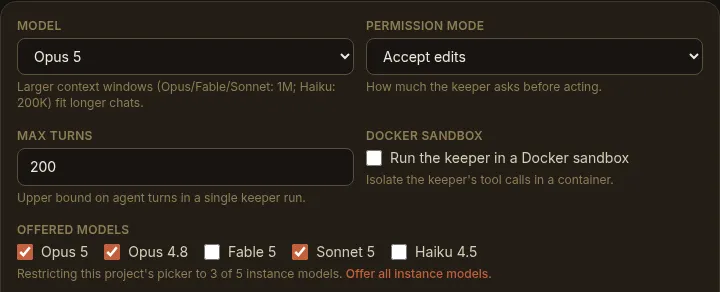
A project may only ever subset the instance list, never widen it; ticking
every box is the same as inheriting, and an Offer all instance models link
clears the override outright. (The instance’s own list is set with
PADDOCK_MODELS or a models: list in paddock.config.yaml.) Because each
model’s context limit and pricing come from Paddock’s built-in catalog, an
allow-list only picks which models are offered — it can’t misconfigure one.
Curation budgets
Section titled “Curation budgets”The post-turn sweeper keeps each of a project’s three curated files under a token budget. The Curation budgets section overrides those per file for this project; leave a field blank to inherit the instance default, which the placeholder shows you:
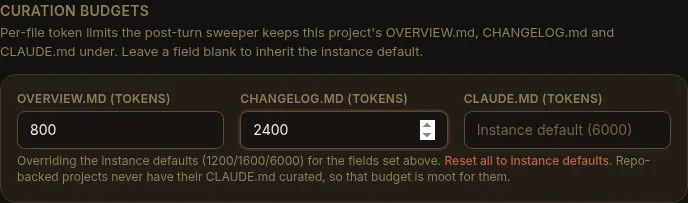
Inheritance is field by field — override CHANGELOG.md alone and the other
two keep tracking the instance defaults. Lowering a budget is the lever for a
chatty project whose notes have grown big enough to weigh on every chat that
preloads them. (An unmanaged project never has its CLAUDE.md curated, so that
budget is moot for it.)
Preload project context (in the composer, not Settings)
Section titled “Preload project context (in the composer, not Settings)”One agent-related toggle lives on the chat composer, not the Settings tab:
Preload project context. On the first turn of a new project chat, it
injects the project’s curated OVERVIEW.md + CHANGELOG.md so Claude starts
already knowing the project’s current state and history. It’s on by default. On a
brand-new project the toggle still appears but is disabled (labelled “no
overview yet”) until the sweeper has written an
OVERVIEW.md — there’s nothing to preload until then.
Promote a root chat into a project
Section titled “Promote a root chat into a project”Not everything starts as a project. A root chat — a conversation on the instance root, belonging to no particular project — is where you think out loud before you know what it is. If one turns out to be worth keeping, don’t copy-paste it: promote it.
From a root chat, click Promote to project. Give it a Project name (pre-filled from the chat), and optionally a summary, area, and domain tags:
Paddock then creates a real project and moves the chat’s full history into it — transcript and all — so the conversation stays resumable under the new project’s agent. Nothing is lost; the root chat simply becomes the project’s first chat.
Next steps
Section titled “Next steps”- Projects — the two axes behind a project’s shape, and what a project directory contains.
- Agents — the agents that do the work in each project.
- The sweeper — how
OVERVIEW.mdandCHANGELOG.mdstay curated (and what “Preload project context” injects). - Environment variables — the box-wide defaults your per-project settings inherit from.